Your weighing system gives inconsistent readings, and you're not sure why. Is it a faulty load cell or a software glitch? This uncertainty costs you time and money.
To manually calculate a load cell's static sensitivity, measure the output voltage (in mV) with a multimeter when a known weight is applied. Then, divide this output voltage by the input (excitation) voltage. The result is the sensitivity rating in millivolts per volt (mV/V).

This simple check is a powerful skill for anyone working with industrial weighing equipment1. In my 18 years of manufacturing scales, I've seen how this basic knowledge empowers our clients. It allows them to quickly troubleshoot problems right on their production floor instead of waiting for a technician. Knowing how to test a sensor yourself gives you control over your equipment and saves you from unnecessary downtime. Let's walk through the steps so you can do it too.
How do you calculate the sensitivity of a load cell?
You have a load cell, but the performance just doesn't seem to match the datasheet. This doubt can stop a project in its tracks. You need a practical way to verify it.
To calculate sensitivity, start by measuring the load cell's output voltage with no load. Then apply a known weight and measure the output voltage again. The difference is your output signal. Divide this signal (in mV) by your excitation voltage (in V) to get the sensitivity.

Let's dive deeper into the practical steps. I remember a client who was about to return a large shipment of load cell2s because their system readings were off. I walked them through this exact process over a video call. It turned out their power supply wasn't providing the stable voltage they thought it was. This simple test saved them weeks of delays and the cost of shipping.
The Four-Step Process
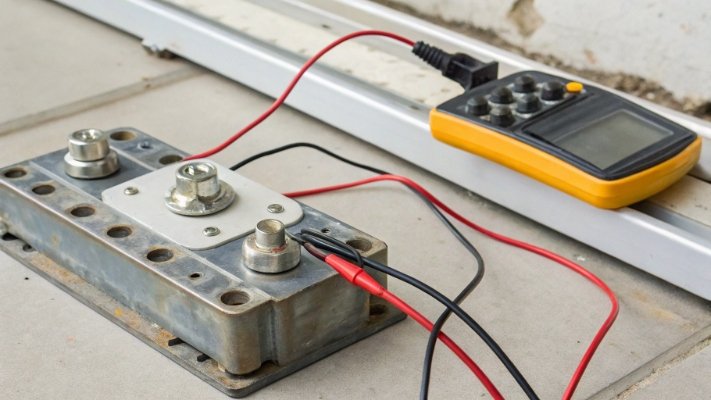
To do this yourself, you only need a few basic tools: a stable DC power supply, a quality multimeter3, and a set of standard, known weights.
- Set Up and Stabilize: First, connect your load cell to the power supply. The red and black wires are typically for the input power, which we call excitation voltage4. Let the circuit warm up for a few minutes to ensure the readings are stable.
- Measure and Record No-Load Output: Set your multimeter to measure DC millivolts (mV). Connect the multimeter probes to the load cell's output wires, usually green and white. With no weight on the load cell, write down this "zero" or "no-load" voltage reading. It should be a very small number, close to zero.
- Apply Load and Measure Again: Now, place a known weight on the load cell. It's best to use a weight that is close to the cell's maximum capacity for the most accurate result. Record the new millivolt reading from your multimeter.
- Calculate the Sensitivity: Subtract the no-load reading from your full-load reading to get the pure output signal5 change. Then, divide that number by your excitation voltage. The result is your load cell's sensitivity in mV/V.
What is the formula for static sensitivity?
You're looking at technical specifications, and the formulas seem confusing. This jargon can feel like a barrier to understanding how your components actually work. It's much simpler than it looks.
The practical formula for calculating static sensitivity is: Sensitivity (mV/V) = [Output Voltage under Load (mV) - No-Load Output Voltage (mV)] / Excitation Voltage (V). This gives you the sensor's direct response to a load.

This formula is the language of load cells. Once you understand it, you can compare any load cell to its datasheet and know instantly if it's performing correctly. Many of our OEM clients integrate this check into their own quality control processes. It gives them confidence that the components they build into their systems are reliable from the start. Let's break down the formula so it's perfectly clear.
Understanding the Variables
The formula might look academic, but each part has a very real-world meaning. Here is a simple breakdown:
| Variable | What It Means | How to Get It |
|---|---|---|
| Output Voltage (mV) | The signal the load cell produces when weight is applied. | Measure with your multimeter. |
| Excitation Voltage (V) | The power you supply to the load cell to make it work. | Measure with your multimeter. |
| Sensitivity (mV/V) | The final result. It tells you how many millivolts of signal the cell will output for every one volt of power you give it, when under its full rated load. | The result of your calculation. |
A Practical Example
Let's put some numbers to it. Suppose you have a 100 kg load cell and you test it using:
- An excitation voltage of 10 Volts.
- A standard weight of 100 kg.
You measure the output and find that it changes by 20 millivolts (mV) from the no-load state.
Your calculation would be:
Sensitivity = 20 mV / 10 V = 2 mV/V
This 2 mV/V is the value you would look for on the load cell's datasheet. If your calculated value matches the datasheet, you know the sensor is working exactly as it should.
How can you check a load cell with a multimeter?
You suspect a load cell is faulty, but replacing it is expensive and time-consuming. You need a quick, reliable way to confirm if the hardware is damaged before you start troubleshooting software.
You can check a load cell with a multimeter by performing resistance tests. Measure the input resistance, output resistance, and bridge balance. These readings, compared to the datasheet, can quickly diagnose wiring breaks, internal damage, or shorts.

These resistance checks are the first thing our own quality control department does when a product is returned. More than half the time, we find a simple issue like a crushed cable that the client could have identified themselves in minutes with a multimeter. This is your first line of defense in troubleshooting. It requires no power, so it's safe, and it can give you a clear "go" or "no-go" for the hardware.
Key Resistance Measurements
Before you begin, make sure the load cell is completely disconnected from any power source or indicator. Set your multimeter to the Ohms (Ω) setting.
-
Input Resistance (Excitation):
- How: Measure the resistance between the +Excitation (often red) and -Excitation (often black) wires.
- What it means: This checks the integrity of the input circuit of the Wheatstone bridge6 inside the sensor. The reading should be very close to the value specified on the datasheet, typically around 380Ω or 760Ω. A significantly different reading indicates a problem.
-
Output Resistance (Signal):
- How: Measure the resistance between the +Signal (often green) and -Signal (often white) wires.
- What it means: This checks the output circuit. This value should also match the datasheet, usually around 350Ω or 700Ω. If it's way off, the sensor has likely suffered an overload or internal damage.
-
Bridge Balance and Insulation:
- How: Check the resistance from each wire to the metal body of the load cell.
. What it means: This checks for insulation breakdown. The reading should be infinite or in the mega-ohm range. A low reading means there is a short circuit, often caused by moisture getting inside the sensor, which will make its output very unstable.
- How: Check the resistance from each wire to the metal body of the load cell.
Taking these three measurements takes less than five minutes and can tell you with high certainty whether your load cell is electrically sound.
How do you calculate load cell accuracy?
Your scale is sensitive and responds to small weights, but the readings aren't repeatable. You're confusing sensitivity with accuracy, a common problem that leads to frustration and incorrect diagnoses.
Accuracy is not a single calculation. It's a performance specification determined by testing for errors like non-linearity and hysteresis. It measures the maximum deviation from a perfect, linear response, expressed as a percentage of the full capacity.

The most important insight I can share from my years in this industry is this: sensitivity and accuracy are not the same. Sensitivity is the magnitude of the response to weight. Accuracy is the correctness of that response. A sensor can be very sensitive but also very inaccurate. Understanding this difference is crucial for building a truly reliable weighing system. You don't "calculate" accuracy with a simple formula; you measure it through a series of tests.
Accuracy vs. Sensitivity
Let me put it another way. Imagine two archers.
- Archer A (Sensitive but Inaccurate): All their arrows hit the target in a tight group, but the group is in the top-left corner, far from the bullseye. This is high sensitivity (repeatable signal) but low accuracy (signal is wrong).
- Archer B (Accurate): Their arrows are grouped tightly right around the bullseye. This is both high sensitivity and high accuracy.
In a load cell, "accuracy" is a measure of how close it is to the bullseye across its entire measurement range.
The Errors That Impact Accuracy
Accuracy is a combined value that includes several types of errors. The main ones are:
- Non-linearity: The error that occurs because the load cell's output does not form a perfect straight line as weight increases from zero to maximum capacity.
- Hysteresis: The difference in the reading for the same weight, depending on whether you are adding weight or removing weight.
- Non-repeatability: The variation in output readings when the same weight is applied multiple times under the same conditions.
To determine accuracy, we test the load cell at multiple points (e.g., 0%, 25%, 50%, 75%, 100% of capacity), both loading and unloading, to measure these errors. The largest error found is then stated as the accuracy class7, such as ±0.02% of full scale.
Conclusion
Manually calculating sensitivity with a multimeter is simple and confirms sensor function. But remember, sensitivity is not accuracy. This key distinction empowers you to build truly reliable and precise weighing systems.
-
Exploring different types of industrial weighing equipment can enhance your understanding of load cells. ↩
-
Understanding load cells is crucial for anyone working with weighing systems, as they are the core components that measure weight. ↩
-
A multimeter is a valuable tool for testing load cells, and learning its use can save time and money. ↩
-
Excitation voltage is key to load cell operation; understanding it can help diagnose issues effectively. ↩
-
Knowing how to measure pure output signal is crucial for assessing load cell performance. ↩
-
The Wheatstone bridge is fundamental to load cell operation; understanding it enhances troubleshooting skills. ↩
-
Accuracy class defines the precision of load cells; knowing it helps in selecting the right sensor. ↩


Comments (0)