
Your lab relies on precise data, but an uncalibrated scale produces errors. This compromises research and can lead to costly rework. Let’s ensure your measurements are always accurate.
To calibrate a laboratory scale, first ensure it's on a stable, vibration-free surface and has warmed up. Then, zero the scale, and use certified weights to perform a span calibration through the scale’s menu. Finally, verify with a test weight and document the results for compliance.

Getting the basics right is crucial for any scientific measurement. I've been in the weighing industry for nearly two decades, and I've seen how a small calibration error can have huge consequences. It is more than just pressing a button. Let's break down the entire process. This will help you make sure you never miss a step. It will ensure your results are always trustworthy and repeatable.
What are the steps to properly calibrate a laboratory scale?
A vague calibration process leads to inconsistent measurements. One wrong move can invalidate your work. Following a strict, step-by-step procedure guarantees repeatable accuracy for every single measurement.
The key steps are preparation, zeroing the scale, performing a span calibration with certified weights, and validating the results. Always access the scale's calibration menu and follow the manufacturer's specific instructions. This systematic approach ensures precision for every reading.

In my experience, the most reliable results come from a consistent and methodical approach. Just like having a pre-flight checklist, a calibration procedure1 eliminates human error and ensures nothing is overlooked. We need to break this down into clear, manageable actions. The process can be divided into preparation, execution, and validation. Each stage is critical for achieving the accuracy your laboratory demands.
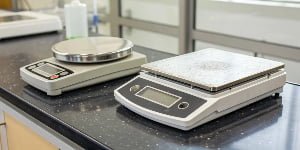
Pre-Calibration Preparation
Before you even touch the calibration weights2, you must prepare the environment and the scale itself. First, check that the scale is on a solid, level surface that is free from vibrations. An anti-vibration table3, like one made of marble, is ideal. Also, make sure the room's temperature and humidity are stable. We recommend 20°C (±2°C) and 40-60% humidity. Finally, turn the scale on and let it warm up for at least 30 minutes. This allows the internal electronic components to stabilize.
Calibration Execution
Once the scale is ready, you can begin the calibration. Here’s a simple breakdown of the execution phase:
| Step Number | Action | Purpose |
|---|---|---|
| Step 1 | Zero the Scale | Press the "Zero" or "Tare" button to ensure the starting point is exactly 0.000g. |
| Step 2 | Enter Calibration Mode | Access the scale's menu. This often involves pressing a "Cal" or "Menu" button. |
| Step 3 | Perform Span Calibration | Place a single certified weight on the pan as prompted. The scale registers this mass and adjusts its internal programming. |
| Step 4 | Perform Linearity Check (Optional) | For high-precision work, test with weights at 25%, 50%, and 75% of capacity to check accuracy across the range. |
Post-Calibration Validation
After calibration, you must confirm it was successful. Use a test weight that was not part of the calibration set. Place it on the scale and check if the reading is within the acceptable tolerance for your lab. Finally, record everything in your logbook: date, time, weights used, environmental conditions, and the final reading. This documentation is essential for quality audits like ISO or GMP.
How often should laboratory scales be calibrated for accurate results?
You calibrate your scales, but maybe not often enough. Over time, drift can creep in, making your data unreliable. A set schedule ensures your scale is always accurate.
For routine use, calibrate quarterly or per your lab's standard operating procedures (SOPs). You must recalibrate immediately if the scale is moved or if results seem inconsistent. For certified labs, annual professional calibration by an accredited service is often required.

The question of "how often" is one I hear all the time. The simple answer is, "it depends." The frequency of calibration is not a one-size-fits-all rule. It depends heavily on how the scale is used, the environment it's in, and the regulatory requirements your lab must meet. A scale used multiple times a day for critical pharmaceutical formulations will need a much more rigorous schedule than one used weekly for general prep work. Your goal is to find a balance that ensures accuracy without creating unnecessary downtime.
Factors Influencing Calibration Frequency
Several factors determine your calibration schedule. Heavy usage naturally requires more frequent checks. Environmental changes like temperature swings or vibrations can also knock a scale out of calibration. If the scale is moved to a new location, it absolutely must be recalibrated. Lastly, the level of accuracy required by your application is a key driver. If you're measuring to four or five decimal places, your tolerance for error is much lower, so you must calibrate more often.
Recommended Calibration Schedules
To make it easier, we can group calibration needs into different tiers. This helps you build a schedule that aligns with your specific laboratory operations. Remember, these are general guidelines. You should always define your own schedule in your Standard Operating Procedures (SOPs).
| Usage Level & Environment | Recommended User Calibration | Required Professional Calibration |
|---|---|---|
| High-Impact Use (e.g., GMP/GLP labs) | Daily or Weekly checks | Semi-Annually or Annually |
| Moderate Use (e.g., R&D, QC) | Monthly or Quarterly | Annually |
| Low Use (e.g., educational labs) | Quarterly or Semi-Annually | Annually or Bi-Annually |
| After an Event (e.g., moved scale, power surge) | Immediately | As needed if user calibration fails |
Ultimately, a proactive approach is best. It is better to calibrate too often than not enough. Consistent calibration builds a history of data. This data can show you if a scale is starting to fail, allowing you to service or replace it before it impacts your work.
What equipment is needed for calibrating a laboratory weighing scale?
Using the wrong tools for calibration can introduce new errors into your measurements. This will invalidate the entire process. Having the right, certified equipment makes calibration simple and effective.
You need a set of certified calibration weights, usually OIML or NIST traceable. You also need anti-static tweezers to handle the weights, a leveling bubble to ensure the scale is horizontal, and a logbook for documenting the entire process.

You cannot achieve a precise calibration without the correct tools. Think of it like a surgeon using sterilized instruments. Each tool has a specific purpose designed to eliminate variables and ensure the calibration process is as accurate as the scale itself. Investing in proper equipment is not an expense. It is an investment in the quality and integrity of your data. Over the years, I've seen many calibration attempts fail simply because the team lacked the right tools for the job.
Certified Calibration Weights
The most critical piece of equipment is your set of calibration weights2. These are not just any pieces of metal. They are highly precise masses manufactured to meet strict international standards, usually from organizations like OIML (International Organization of Legal Metrology) or NIST (National Institute of Standards and Technology). The class of the weight (e.g., E2, F1) determines its tolerance. You should choose a weight class that is more accurate than the readability of your scale.
Essential Handling Tools
How you handle the weights is just as important as the weights themselves. Never, ever touch calibration weights with your bare hands. The oils, moisture, and dirt from your skin will change their mass and make them inaccurate. This is why anti-static tweezers or clean, lint-free gloves are mandatory. Keeping your weights clean and storing them in their protective case will preserve their accuracy for years.
Essential Equipment Checklist
Here is a table summarizing the tools you need and why they are so important. Having these on hand will make your calibration process smooth, professional, and correct.
| Equipment | Purpose | Best Practice |
|---|---|---|
| Certified Weights | Provides the known mass standard for calibration. | Use a weight class appropriate for your scale's resolution. Keep them clean and stored properly. |
| Anti-Static Tweezers/Gloves | Prevents contamination of weights from skin oils and dirt. | Always use them to handle weights. Never touch weights directly with your hands. |
| Leveling Bubble | Confirms the scale is perfectly horizontal for accurate weighing. | Check the bubble before every calibration and adjust the scale's feet as needed. |
| Logbook (Digital or Physical) | Documents the calibration process for compliance and traceability. | Record the date, scale ID, weights used, results, and the technician's name. |
| Dust Brush | Gently removes any dust from the weighing pan before calibration. | Use a soft-bristle brush to clean the pan without scratching it. |
What are common errors to avoid when calibrating a laboratory scale?
You follow all the calibration steps, but the results are still off. Small, hidden errors are undermining your work. Learning to spot these common mistakes will save you frustration.
Avoid unstable surfaces, air drafts, and fluctuating temperatures. Never touch calibration weights with your bare hands. Do not skip the warm-up period, and always place the weight in the center of the pan for accurate readings. These small details make a big difference.

After spending years helping clients troubleshoot weighing issues, I can tell you that most problems come down to a few common, avoidable mistakes. It is often not the scale that is faulty, but the process. I once visited a lab where results were all over the place. The issue? Their high-precision analytical balance was placed right under an air conditioning vent. The subtle air current was enough to throw off every measurement. Recognizing these pitfalls is the first step toward perfecting your calibration technique.
Environmental Errors
The environment around the scale has a massive impact on its performance. Vibrations from nearby equipment, foot traffic, or even the building itself can cause fluctuating readings. Air drafts, whether from HVAC systems, doors opening, or even people walking by, can exert force on the weighing pan, especially with analytical balances. Temperature and humidity changes can also cause components to expand or contract, leading to drift. Always perform calibrations in a controlled and stable location.
Procedural Errors
Even in a perfect environment, mistakes in procedure can ruin a calibration. The most common error is handling weights with bare hands. Another is skipping the scale's warm-up time. The electronics need to reach a stable operating temperature for accuracy. Placing the weight off-center on the pan, known as a corner load error, will also produce an inaccurate result. Finally, a simple but often overlooked mistake is using the wrong calibration weight or an uncertified weight.
How to Avoid Common Pitfalls
Here is a problem-solution table that you can use as a quick reference to ensure you avoid these common calibration mistakes.
| The Error | The Cause | The Solution |
|---|---|---|
| Unstable Readings | Vibrations or air currents are interfering with the scale. | Place the scale on an anti-vibration table and use a draft shield. |
| Inaccurate Calibration | Handling weights incorrectly and contaminating them. | Always use clean tweezers or lint-free gloves to handle weights. |
| Drifting Results | The scale was not properly warmed up before use. | Allow the scale to warm up for at least 30-60 minutes before calibrating. |
| Inconsistent Readings | The weight was not placed in the center of the weighing pan. | Always place the calibration weight directly in the center of the pan. |
| Systematic Error | Using expired or damaged calibration weights for the procedure. | Have your weights professionally re-certified on a regular schedule. Inspect them for damage. |
Conclusion
Proper calibration is non-negotiable for lab accuracy. Following these steps, using the right tools, and avoiding common errors will ensure your weighing results are always reliable and trustworthy.
- Following a standard procedure is key to accuracy; find detailed steps to ensure proper calibration. ↩
- Choosing the right calibration weights is essential for accuracy; discover the different types available. ↩ ↩
- An anti-vibration table stabilizes your scale for accurate readings; learn more about its benefits. ↩


[…] 3.0 mV/V. This tells you how much electrical signal it outputs for a given weight. Next, check the non-linearity error5, which should be very low—ideally less than 0.03% of its full scale. This ensures it's accurate […]
[…] air suspension system. The calibration process simply syncs this pressure reading with actual, certified weights5. It creates two reference points—empty and full—and the device calculates all the weights in […]
[…] Object Placement: Always place the item in the center of the weighing pan. Placing it on a corner can put uneven stress on the load cells, producing a different and often inaccurate reading. This is known as "corner load error4." […]
[…] Industrial, commercial, and legal-for-trade applications. It is the most common and provides a calibration certificate for audit10s. […]
[…] should always be done according to the manufacturer's instructions5. A general process looks like […]
[…] weights are manufactured to conform to strict international standards, most commonly set by the OIML (International Organization of Legal Metrology)1. This organization defines different “classes” of weights, each with a specific […]