Inaccurate readings are costly and undermine your operational reliability. These small errors can spoil entire production runs and damage customer trust. Proper load cell calibration is the essential fix for this problem.
The best way to calibrate a load cell is to follow a standard procedure. This includes preparing the balance in a stable environment, performing a zero-point check, and then using certified standard weights to calibrate the span, linearity, and test for eccentric load errors. This ensures accuracy.

Knowing you need to calibrate is one thing, but doing it correctly is another. A flawed process gives a false sense of security, which is worse than knowing your scale is off. Let's break down the exact steps I've learned over 18 years in the industry to get it right every time, ensuring your measurements are always trustworthy.
What is the proper procedure to calibrate a load cell in a weighing balance?
You worry that your current calibration method might not be completely accurate. An improper procedure can make you think your scale is precise, leading to bigger issues later. Following a standardized, step-by-step process is the only way to guarantee repeatable precision.
The proper procedure involves three main stages: pre-calibration checks, the calibration sequence itself, and post-calibration documentation. This includes leveling the balance, performing zero, span, and linearity tests with correct weights, and finally, recording the results and setting a new calibration date.

In our manufacturing facility, we treat calibration as a critical process, not just a routine check. A correct procedure is everything. It's about creating a repeatable and verifiable result. Let's go deeper into the specific steps we use to ensure every scale we produce or service is perfectly accurate.
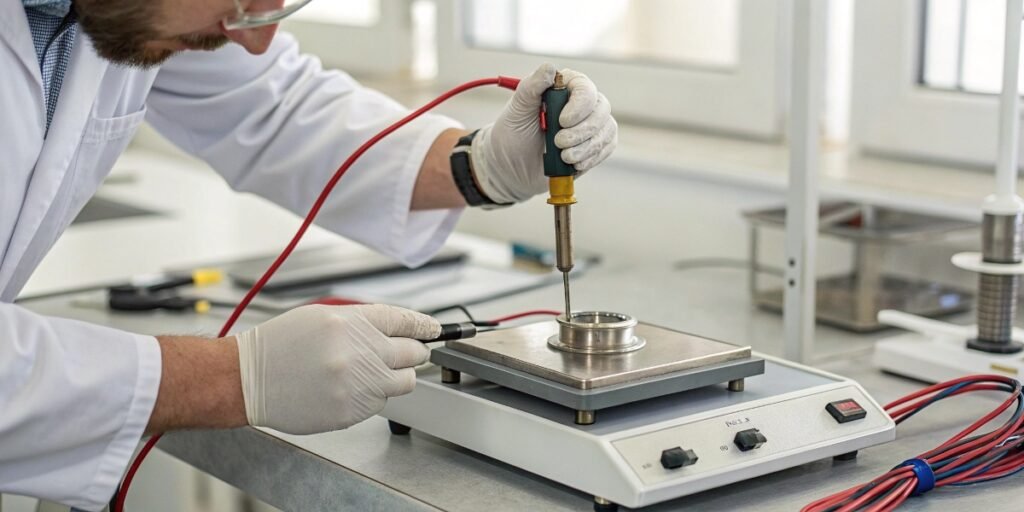
Pre-Calibration Checks
Before you even touch a calibration weight, you must prepare the balance and its environment. This foundation is critical for an accurate outcome.
- Environment: The room should be stable. A temperature of around 20°C (68°F) and humidity between 45-60% is ideal. Most importantly, ensure there are no vibrations, air drafts from vents, or electromagnetic interference from other equipment. We always use anti-vibration tables1 for high-precision balances.
- Warm-up: Electronic components need time to stabilize. A precision balance needs at least 1 hour, while a high-precision analytical balance needs 4 hours or more.
- Leveling: Use the built-in bubble level. The bubble must be perfectly centered. An unlevel balance will give inconsistent readings, especially during off-center tests.
- Cleaning: The weighing pan must be spotless. We use ethyl alcohol and a lint-free cloth to remove any dust or residue.
The Calibration Steps
Once the balance is prepared, follow this sequence.
| Test Type | Purpose | How to Perform |
|---|---|---|
| Zero Calibration | Sets the correct zero point. | Empty the weigh pan. Press the Tare or Zero button. Wait for the reading to stabilize at 0.00. |
| Span Calibration | Adjusts the scale's full range. | Place a standard weight (e.g., 50% or 100% of capacity) on the pan. Enter the weight's exact value into the balance's calibration menu. The balance automatically adjusts its internal factor. |
| Linearity Test | Checks accuracy at several points. | Sequentially place weights at different increments (e.g., 20%, 50%, 80%, 100% of capacity). Check that the reading at each point is within the maximum permissible error (MPE). |
| Eccentricity Test | Checks for off-center load errors. | Place a single weight (usually 1/3 of max capacity) in the center and then on each of the four quadrants of the pan. The readings should not differ by more than the specified tolerance2. |
Post-Calibration Actions
After a successful calibration, record the date, the standard weights used, and the results. Apply a calibration sticker3 to the device showing the date it was performed and when the next one is due.
What tools and standards are required for accurate load cell calibration?
Using the wrong tools for calibration is the same as guessing the result. This can make your measurements less accurate than before you started and can even damage sensitive equipment. Professional results depend on using the right certified tools and standards.
For accurate calibration, you absolutely need a set of certified standard weights. Their accuracy class must be higher than the balance you are testing. You also need a stable, vibration-free environment, proper cleaning supplies, and non-static tweezers for handling the weights.

We often see clients experiencing issues because they tried to calibrate with makeshift items, like a can of soda or a paperweight. This simply doesn't work for professional applications. The most important tool in your kit is your set of standard weights, often called mass standards. Their quality is not negotiable.
Choosing the Right Standard Weights
The weights themselves must be more accurate than the scale. The rule is to use weights of a higher accuracy class than the balance's readability.
| Balance Type | Readability (d) | Required Weight Class (OIML) |
|---|---|---|
| Analytical Balance | 0.0001 g | Class E2 |
| Precision Balance | 0.01 g - 0.001 g | Class F1 |
| Standard Industrial Scale | 1 g - 0.1 g | Class M1 |
| Heavy-Duty Industrial Scale | >10 g | Class M2 |
These weights must be handled with care, using tweezers or gloves to avoid transferring oils and dirt from your hands, which would change their mass. They also require periodic re-certification by a metrology lab to ensure their own accuracy hasn't drifted.
Other Essential "Tools"
Beyond weights, your environment is a tool. We've already discussed the need for a stable surface and controlled atmosphere. Other necessary items include:
- An Anti-Vibration Table: This is a must for any high-precision balance.
- Leveling Feet: These are part of the balance, but ensuring they work and are used correctly is a key part of the toolkit.
- Cleaning Supplies: Ethyl alcohol and lint-free cloths.
- Documentation Tools: A logbook or software to record calibration results.
Without these specific tools and a controlled setup, any calibration attempt is just a rough estimate at best.
How often should you calibrate the load cell of a balance for reliable measurements?
You perform calibrations, but doubt if you're doing it often enough. Infrequent calibration allows for measurement drift, which can slowly compromise product quality and compliance over time. A consistent and appropriate calibration schedule is your best defense against creeping inaccuracy.
Frequency depends on the balance's precision, usage, and environment. For high-precision analytical balances in daily use, weekly or even daily checks are recommended. For general-purpose industrial scales, quarterly or semi-annual calibration is often sufficient to ensure reliability.

As a manufacturer, we empower our clients to build a schedule that makes sense for them. There's no single "one-size-fits-all" answer, but there are clear guidelines. Over-calibrating wastes time, while under-calibrating introduces risk. The goal is to find the right balance.
Factors That Determine Calibration Frequency
Think about these four factors when building your schedule.
- Application Criticality: If the measurement is for a critical component, like a pharmaceutical ingredient, calibration should be very frequent (daily or weekly). If it's for general shipping, it can be less frequent.
- Usage Level: A scale used 100 times a day will drift faster than one used 10 times a week. Higher usage demands more frequent calibration.
- Environment: A scale in a harsh environment with temperature swings, dust, and vibrations needs more attention than one in a clean, stable lab.
- Required Tolerance: If your process has very tight tolerances, you must calibrate more often to ensure you never operate outside of that narrow window.
Recommended Calibration Schedules
Here is a general guide we provide to our customers.
| Balance Type | Usage Level | Recommended Frequency | Notes |
|---|---|---|---|
| Analytical Balance | High (Daily Use) | Daily check, Weekly full calibration | User checks with a single weight daily. |
| Precision Balance | Medium (Weekly Use) | Monthly calibration | Recommended for labs and quality control. |
| Industrial Bench Scale | High (Daily Use) | Quarterly calibration | Check more often if environment is harsh. |
| Floor Scale / Heavy-Duty | Low / Intermittent | Semi-annual or Annual calibration | Always calibrate after moving the scale. |
And remember, any time a scale is moved, subjected to a shock (like something being dropped on it), or repaired, it must be recalibrated immediately, regardless of the schedule.
What are common errors encountered during load cell calibration and how can they be avoided?
You've followed the steps, but your calibration results are still inconsistent. Hidden errors can invalidate the entire process, wasting your time and making you question the equipment's reliability. Knowing the common pitfalls is the first step to avoiding them completely.
Common errors include using incorrect or dirty weights, calibrating in an unstable environment, not leveling the balance, or skipping the mandatory warm-up period. Meticulous preparation and careful handling of equipment are the keys to avoiding these simple but critical mistakes.

After 18 years of troubleshooting customer issues, I can tell you that most calibration "failures" are not due to a faulty load cell. They are almost always caused by a handful of preventable mistakes. These simple oversights can lead you to believe you have a major hardware problem when the solution is much easier.
Common Pitfalls and How to Prevent Them
Let's break down the most frequent mistakes we see and how you can sidestep them to achieve a perfect calibration every time.
| Common Error | Why It Happens | How to Avoid It |
|---|---|---|
| Environmental Interference | Air drafts from an open door or HVAC system, or vibrations from nearby machinery, disrupt the sensitive load cell. | Calibrate in a closed room away from traffic. Use a draft shield for the balance and place it on a solid, anti-vibration table. |
| Using a Cold Balance | The electronic components have not reached thermal stability, causing their performance to drift during calibration. | Always follow the manufacturer's recommended warm-up time before starting. For precision scales, this is at least one hour. |
| Incorrect or Dirty Weights | Using weights of the wrong class, or weights with dust or fingerprints, introduces a known error into the system from the start. | Use the correct class of certified weights. Handle them only with clean tweezers or gloves, and store them in their protective case. |
| Unlevel Balance | The force is not applied vertically to the load cell, leading to errors, especially in eccentricity (corner-load) tests. | Check the bubble level before every single calibration. Adjust the leveling feet until the bubble is perfectly centered. |
| Skipping Linearity/Eccentricity | Only performing a two-point (zero and span) calibration assumes the scale is accurate everywhere else, which isn't always true. | Always test at multiple points (linearity) and check the corners of the pan (eccentricity) to ensure accuracy across the entire surface and range. |
It's also worth noting that trying to "calibrate" a precision scale with an object of known weight, like a coin, is not a true calibration. This is merely a check. It can tell you if the scale is wildly off, but it cannot be used to accurately adjust the instrument's response. For that, you need true, certified standards.
Conclusion
Proper calibration ensures accuracy. It demands the right procedure, certified tools, a consistent schedule, and avoiding common errors. This protects your measurements, your products, and your business's reputation.


Comments (0)